

Hello everyone, come back with us wandani.org, today we will make a simple business card that we quote from our friend's blog to share with the language version of ingris.langsung course, the purpose of this learning is :
A. Learning objectives:
Know the setting of paper / worksheet
Know the size setting
Know the basic tools of object creation
Know how to use the image / guideline tool
Know the difference of fill / fill color and line / outline color and can
Know the difference between artistic text and text paragraph
Able to create artistic text design
Able to arrange finished design on paper for printing process
B. Working Steps
1. Setting Paper / worksheet: before starting to create the object, first determine the field of our work in the way as in the picture:

2. Next set the size of the object shift / nudge distance

Nudge distance is used to set the object shift step when we use the sliding function with the keyboard
3. To simplify the image process, set the following snap object:

4. Now go to the image process. Create a box object by clicking Rectangle Tool then drag it on the work screen. Set the box size to be 90 x 55 mm

5. Business cards will look small. To adjust the display size can be done through the zoom tool or through the menu bar as in the following figure:

6. Selection object using Pick Tool, then give the color of the contents of the box object by selecting color selections on Color Pallete. In this case remove the color of the box line

Note:
Object Color is divided into two, namely the color of the contents and the color of the line of the object. To give the color of the contents by selecting the color then left click, while to give color to the line by selecting the color then right click.
To eliminate the color of both the color of the contents and the color of the line is selected crossing box icon on Color Pallete.

7. Create a box object again size 30 x 15 mm then position as in the picture

8. Select the box object by using the Pick Tool, then set the left and top corners of the box through Corner Roundness in the lower-left and top right corner. Do not forget to disable the Round Corner Together icon. Next give the color of the black object


9. Next create a circle using the Ellipse Tool. Press and hold Ctrl key on keyboard then Drag. Edit the size of a circle by 12 x 12 mm. Add white color without borders (remember the object coloring technique - step # 6) and position the circle object as shown

10. Create a circle object into a half circle by activating the Shape Tool and Pie format on the menu bar. Next while pressing the Ctrl key on the Keyboard then click drag on the circle node to form a semi-circle object as shown


11. Then create a triangle object using the Polygon Tool, on the menu bar change the Points of Sides to 3 then drag and place the triangle object as shown. Color fill / fill with white


12. Duplicate the semi-circle object by selecting a semi-circle object by using Pick Tool and then select Copy and Paste through the menu bar or with keyboard keys Ctrl + C and Ctrl + V (the duplicated object is just above the copied object). Next while pressing the Ctrl key Picktool at the middle left object edit point then drag to the right (mirror)

13. Release the Ctrl button and then position the semicircle of the mirrored copy that has been mirrored in a position like the image

14. To reflect the object can also use the Mirror Horizontal icon on the Property Bar

15. To adjust the distance between objects and the position of objects together with each other, we can use the facilities menu Align And Distribute. Selection of the three objects (2 objects half-lingakaran and 1 object triangle) then select the menu Align And Distribute. To select objects more than one can with drag techniques or with the Shift + Click object.

16. Align And Distribute dialog box window appears then set the position of the object as desired. In this case the flat top and bottom are equal

17. Next we will be creative with Text. Click Text Tool then click on worksheet as an example type "PERCETAKAN"

18. Adjust the size by using the Pick Tool. Point the Pick Tool on the edges corner of the object's edges then drag it inwards so that the object's size becomes smaller (drag out the larger object size)

19. Change the font type as you wish and position the text "PERCETAKAN" as shown


20. In the same way create another text object "ARTA MANDIRI". In this case because of the same font size you can use the Copy Paste text "PERCETAKAN" function then after PASTE select menu Text - Edit Text

21. After the Edit Text dialog box appears change the text "PERCETAKAN" to "ARTA MANDIRI". Then click OK and position the text according to the image


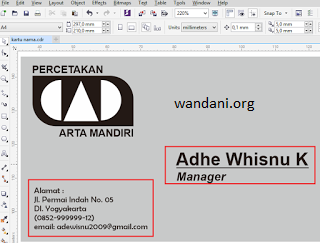
22. Next create the text again for example the text name and address as in the following picture with the size adjust


23. Once done, arrange the name card object into sections as shown in the drawing for the printing settings. Change the paper you want to use in accordance with the needs then arrange some business card objects so that it becomes some object. Use Copy Paste function. Before the Copy Paste process, select all objects first then select the Group menu. After that do Copy Paste as needed.


24. Before printing, see the results first through the File - Print Preview menu.


25. If you see a case like the picture below, then there is part of the object that does not come printed


26. Solution: Make sure the paper selected on the printer matches the paper selected in the corel design


27. If all objects are already in the print area, then the design is ready to print

28. Good luck and creativity.
All of us, please share, comment if this article useful, thank you by Team WANDANI.ORG

All of us, please share, comment if this article useful, thank you by Team WANDANI.ORG


Tidak ada komentar:
Posting Komentar